(Patients -> View Chart -> Clinical -> Nursing Station)
This section covers:
Vital Signs details of a patient. You may access, record, and change the details.
To access vital signs:
1. Use the main Search to search for a patient.

Fig 1: Search Results
2. In the search results, click Chart.
The Patient Chart is displayed with the Patient Dashboard selected.

Fig 2: Patient Dashboard
3. From the left menu, under Clinical, click Nursing Station.
The Nursing Station window is displayed.

Fig 3: Nursing Station
The Nursing Station window is displayed. (This image is displayed when you reach here from the Screening process.)

Fig 4: Nursing Station Screening
To enter vital signs:
4. In the Nursing Station window, in the Vitals widget, click Add/Edit.

Fig 5: Vital Signs widget
The Vital Signs popup is displayed.

Fig 6: Vital Signs popup
5. Enter/Select the following.
Note: Fields marked with * are mandatory.
| S.No. | Field Name | Field Details |
| 1. | Vitals not done | Select this check box, if vitals are not done for the patient. Select a reason for not doing the vitals from the drop-down list. |
| Enter the following details, if vitals are done for the patient. | ||
| 1. | Blood Pressure * | Enter the blood pressure details of the patient. |
| 2. | Pulse | Enter the pulse rate of the patient. |
| 3. | Temperature * | Enter the temperature of the patient. |
| 4. | Weight * | Enter the weight of the patient in pounds. |
| 5. | Height * | Enter the height of the patient in inches. |
| 6. | BMI * | Enter the body mass index of the patient. |
| 7. | Respiration * | Enter the respiration details of the patient in minutes. |
| 8. | Oxygen Saturation | Enter the percentage of oxygen saturation. |
| 9. | Waist Cric. | Enter the circumference of the patient’s waist in inches. |
| 10. | Head Cric. | Enter the circumference of the patient’s head in inches. |
| 11. | Status | Select a status for smoking from the drop-down list. |
| 12. | Packs/Day | If the patient is a smoker, record the number of packs smoked per day. |
| 13. | Year Smoked | If the patient is a former smoker, record the year when the patient last smoked. |
| 14. | Note | Enter notes, if any. |
6. Click Add.
A message stating successful addition of details is displayed. The details are then displayed below the fields.
Tip: Click Edit to edit the entered details. Click Cancel to cancel the entered details.

Fig 7: Vital Signs popup added
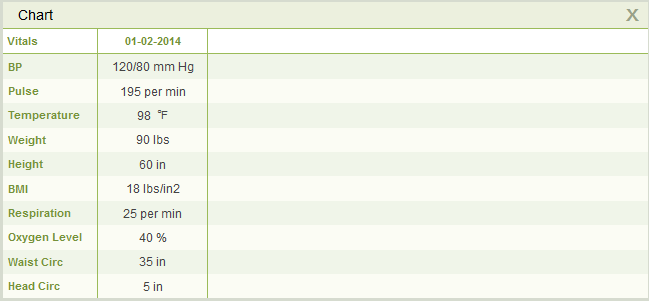
7. Click Chart.
The Chart is displayed.

Fig 8: Vital Signs chart
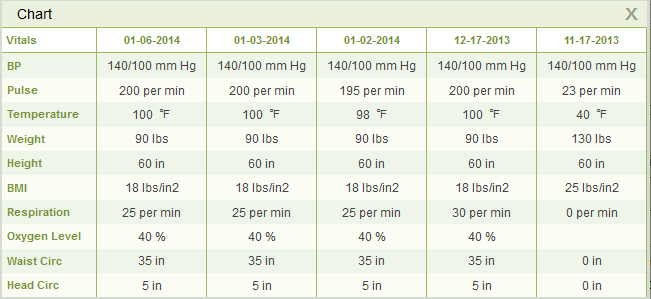
Note: If a patient has visited the clinic many times during which his/her vital signs are recorded, the chart appears with data for different visits.

Fig 9: Vital Signs chart - Multiple visits
8. Click the ‘X’ symbol given at the top right hand corner of the Vital Signs window to close it.
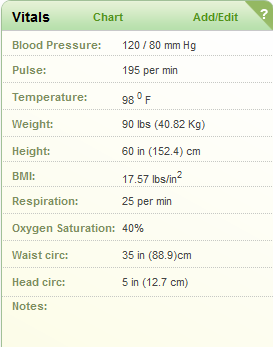
The Vital Signs widget now displays the entered details.

Fig 10: Vital Signs widget added
Tip: Clicking Chart in the widget also results in the same display as seen while clicking Chart in the Add/Edit popup window.
Note: When a patient has multiple visits, a banner appears on top of the Vitals widget with side arrows to help the user to navigate to data of different visits.

Fig 11: Vital Signs widget multiple visits
(Back to Screening) (Click the hyperlink to go back to the Screening section.)